
Mastering Middleware in .NET 10: The Real-World Guide
Summary
Discover how to master ASP.NET Core middleware in .NET 10 with real-world examples, practical tricks, and developer-friendly insights — no boring theory, just code that works.
Why Middleware Matters
Every request in ASP.NET Core passes through a pipeline — a chain of middleware components.
Each one can:
Inspect the request
Modify it
Stop it entirely (short-circuit it)
Or let it continue to the next component
Think of middleware like airport security checkpoints —
Each station checks or adds something before letting you board (your endpoint).
In .NET 10, middleware got smarter, faster, and easier to configure — so let’s master it without the boring theory.
Step 1: Build Your First Middleware (in .NET 10)
Create a new ASP.NET Core Web App (Minimal API).
Then open Program.cs and paste this:
var builder = WebApplication.CreateBuilder(args);
var app = builder.Build();

// 1️⃣ Logging
middlewareapp.Use(async (context, next) =>
{
  Console.WriteLine($"➡️ {context.Request.Method} {context.Request.Path}");
  await next();
  Console.WriteLine($"⬅️ {context.Response.StatusCode}");
});

// 2️⃣ Add a custom header
app.Use(async (context, next) =>
{
  context.Response.Headers.Add("X-App-Version", "1.0");
  await next();
});

// 3️⃣ Terminal middleware
app.Run(async context =>
{
  await context.Response.WriteAsync("Hello from .NET 10 middleware!");
});

app.Run();
How it works:
Use() = continue the chain
Run() = stop the chain
Middleware runs in order, both before and after each
next()call
👉 Try it:
Open your browser → see the message
Check your terminal → see request/response logs
Step 2: Add a Product-Specific Middleware (Branch Logic)
Let’s create a branch pipeline only for /products.
app.Map("/products", products =>
{
  products.Use(async (context, next) => {

  Console.WriteLine($"🛍 Product middleware hit: {context.Request.Path}");
    context.Response.Headers.Add("X-Product-Service", "Active");
    await next();
  });

  products.Run(async context => {
  await context.Response.WriteAsync("Welcome to the Product Catalog!");
  });
});
✅ Now test:
/→ shows default/products→ hits product middleware
💡 Tip: Map() creates its own mini-pipeline.
Great for clean separation like /api, /admin, or /user.
Step 3: Add a Request Timer (Performance Tip)
Measure how long each request takes — perfect for spotting slow endpoints.
app.Use(async (context, next) =>
{
  var watch = System.Diagnostics.Stopwatch.StartNew();
  await next();
  watch.Stop();
  Console.WriteLine($"⏱ {context.Request.Path} took {watch.ElapsedMilliseconds} ms");
});
👉 Place this near the top of the pipeline for best accuracy.
You’ll instantly see request timings in your logs.
Step 4: Maintenance Mode (No Redeploys Required)
Want to take your site offline for a few minutes — without killing the app?
app.MapWhen(ctx => ctx.Request.Query.ContainsKey("maintenance"), branch =>
{
  branch.Run(async ctx => {ctx.Response.StatusCode = 503;
    await ctx.Response.WriteAsync("🧹 Site under maintenance. Be right back!");
  });
});
🧠 Go to /?maintenance=true → shows “under maintenance” Go to / → works normally
💡 MapWhen() lets you branch by condition, not just path.
Step 5: Common Middleware You’ll Actually Use
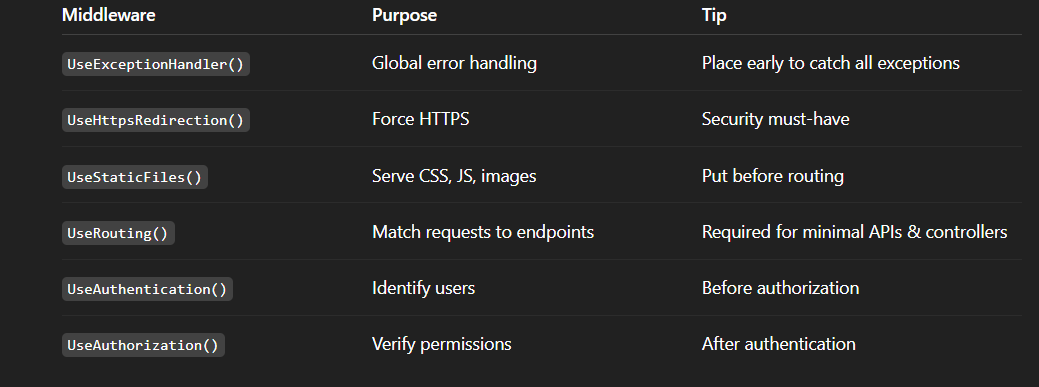
🧠 Golden Rule: The order matters — always.
Step 6: Correct Middleware Order (The Developer Formula)
Here’s the typical order most .NET 10 pros use:

1️⃣ Error Handling
2️⃣ Security / HTTPS
3️⃣ Logging
4️⃣ Static Files
5️⃣ Routing
6️⃣ Authentication / Authorization
7️⃣ Custom Middleware
8️⃣ Endpoints (Controllers or Minimal APIs)
If something acts weird — check your order first!
Step 7: Bonus — Pro-Level Middleware Tricks
Add a Correlation ID (for Tracing)
app.Use(async (context, next) =>
{
  var id = Guid.NewGuid().ToString();
  context.Response.Headers.Add("X-Correlation-ID", id);
  await next();
});
Now every log or service call can use the same ID — super useful in distributed systems.
Enable Output Caching (Built-in in .NET 10)
app.MapGet("/popular-products", () => new[] { "Laptop", "Phone", "Tablet" })
.CacheOutput(p => p.Expire(TimeSpan.FromSeconds(30)));
🔥 Boosts performance instantly — built-in and super easy.
Create a Custom Middleware Class
Keep your logic clean and reusable:
public class TimerMiddleware
{
private readonly RequestDelegate _next;
private readonly ILogger<TimerMiddleware> _logger;

public TimerMiddleware(RequestDelegate next, ILogger<TimerMiddleware> logger)
{
_next = next;
_logger = logger;
}

public async Task InvokeAsync(HttpContext context)
{
  var watch = System.Diagnostics.Stopwatch.StartNew();
    await _next(context);
    watch.Stop();
    _logger.LogInformation($"{context.Request.Path} took {watch.ElapsedMilliseconds}   ms");
  }
}

// Register in Program.cs
app.UseMiddleware<TimerMiddleware>();
🧠 Developer Tricks You’ll Love
💡 Pro Tips:
Keep each middleware small — do one job.
Use
Map()andMapWhen()to keep logic tidy.Never forget
await next()unless you want to stop the pipeline.Always log
TraceIdorCorrelation IDfor debugging.Add
OutputCacheandRateLimiteronly where needed.
🏁 Final Takeaway
Middleware is the heart of ASP.NET Core — every request flows through it.
Once you understand the flow, you can:
Control performance
Add smart features (like caching, headers, rate limits)
Build cleaner APIs
No boring theory. Just power, control, and clean code.
⚙️ At a glance?
✅ Middleware = request checkpoints
✅ The order defines your app’s behavior
✅ Use() continues, Run() ends
✅ Map() and MapWhen() create mini pipelines
✅ .NET 10 adds Output Caching, Rate Limiting & more